Overview
This section provides a brief introduction to some of the advanced features of RealGrid2, along with a simple guide to using the grid.
After reading this guide, you can look through the rest of the documentation and example pages to better understand the features of RealGrid2.
Key Objects
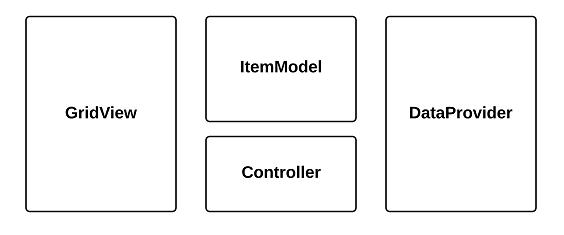
Let's take a look at the conceptual diagram and key objects of RealGrid2.
- GridView: This is an important object that is responsible for the visible part.
- DataProvider: This is an important object that manages data.
- DataField: This is an object that is responsible for the logical location for storing data.
- DataColumn: This is an object that contains properties for displaying the information of DataField on the screen. - ItemModel or GridItem: A model object that contains the row information displayed in the grid.
- Controller: A name that encompasses various internal objects for manipulating items in the grid.
React or Vue3 Grid Component Guide
React, Vue3 wrappers are available, so developers who wish to use them should contact the technical support team.
Obtaining a License
RealGrid2 is a product that requires a license key.
The license key can be downloaded from RealGrid service site (opens in a new tab) as follows.
- Register as a user and log in to the RealGrid service site.
- Create a new project in Create Project (opens in a new tab).
- In the License tab, click the Issue Development License button to issue a development license.
- Download the license.
License Settings
There are two ways to set a license for RealGrid.
There is a method using the existing script tag and a method using setLicenseKey().
Applying a license through a script tag
<head>
    ...
    <script src="/public/realgrid.2.8.3/realgrid-lic.js"></script>
    ...
</head>
Applying a license when installing grid through a module
import RealGrid from "./realgrid";

RealGrid.setLicenseKey("LicenseKey");
Installing Source
There are several ways to include RealGrid2 in your project.
Download Source
- Log in to the RealGrid service site.
- Download the product from the project you created to issue a license.
<head>
    ...
    <!-- RealGrid -->
    <link href="/public/realgrid.2.8.3/realgrid-style.css" rel="stylesheet" />
    <script src="/public/realgrid.2.8.3/realgrid.2.8.3.min.js"></script>
    ...
</head>
NPM
npm install realgridCDN
Specify RealGrid version
If you use cdn by specifying the version directly, you can load the source after specifying the version as follows.
<head>
    ...
    <link
        href="https://cdn.wooritech.com/realgrid/realgrid.2.8.3/realgrid-style.css" rel="stylesheet"/>
    <script src="https://cdn.wooritech.com/realgrid/realgrid.2.8.3/realgrid.2.8.3.min.js"></script>
    ...
</head>
RealGrid latest version
If you always want to keep the latest version, you can load the latest source.
<head>
    ...

    <link href="https://cdn.wooritech.com/realgrid/latest/realgrid-style.css" rel="stylesheet"/>
    <script src="https://cdn.wooritech.com/realgrid/latest/realgrid.min.js"></script>
    ...
</head>
Simple Grid Example
- Create a DOM element.
<div id="realgridContainer" style="width: 100%"; height: 440px;></div>- Create a LocalDataProvider object to store data and a GridView object to display data.
<script>
    const container = document.getElementById("realgridContainer");
    const provider = new RealGrid.LocalDataProvider();
    const gridView = new RealGrid.GridView(container);
    gridView.setDataSource(provider);

    // or

    const provider = new RealGrid.LocalDataProvider();
    const gridView = new RealGrid.GridView("realgridContainer");
    gridView.setDataSource(provider);
</script>
In the last line, connect GridView and DataProvider using the setDataSource() function.
- After creating fields and columns, insert data into dataProvider.
<script>
        const fields = [
            {
                fieldName: "KorName",
                dataType: "text",
            },
            {
                fieldName: "Gender",
                dataType: "text",
            },
            {
                fieldName: "Age",
                dataType: "number",
            },
            {
                fieldName: "Phone",
                dataType: "text",
            },
        ];
        const columns = [
            {
                name: "KorName",
                fieldName: "KorName",
                width: "60",
                header: {
                    text: "이름",
                },
            },
            {
                name: "Gender",
                fieldName: "Gender",
                width: "40",
                header: {
                    text: "성별",
                },
            },
            {
                name: "Age",
                fieldName: "Age",
                width: "40",
                header: {
                    text: "나이",
                },
            },
            {
                name: "Phone",
                fieldName: "Phone",
                width: "100",
                header: {
                    text: "전화번호",
                },
            },
        ];

        const data = [
            {
                KorName: "박영호",
                Gender: "남",
                Age: "71",
                Phone: "(025)6563-2802",
            },
            {
                KorName: "조일형",
                Gender: "남",
                Age: "62",
                Phone: "(093)8809-8696",
            },
            {
                KorName: "김덕중",
                Gender: "여",
                Age: "53",
                Phone: "(064)5483-6874",
            },
            {
                KorName: "국영석",
                Gender: "남",
                Age: "63",
                Phone: "(044)7055-3032",
            },
        ];

        document.addEventListener("DOMContentLoaded", function () {
            RealGrid.setLicenseKey("LicenseKey");

            const provider = new RealGrid.LocalDataProvider();
            const gridView = new RealGrid.GridView("realgridContainer");
            gridView.setDataSource(provider);

            provider.setFields(fields);
            gridView.setColumns(columns);

            Option setting;
            Callback setting;

            provider.setRows(data);
        });
</script>
Recommended settings order
When using grid, the following order is recommended
- Create a LocalDataProvider object to store data and a GridView object to display data
- Connect GridView and DataProvider through the setDataSource() function
- Create fields and columns
- Set options (editOptions, displayOptions, etc.)
- Declare the required callback function
Keyboard shortcut Tip
HOME: Move to the first column
END: Move to the last column
HOME + shift: Select up to the first column
END + shift: Select up to the last column
page up: Top of the screen
page down: Last of the screen ctrl + home : first row ctrl + end : last row F2 : edit mode