Preparing the grid
Main object
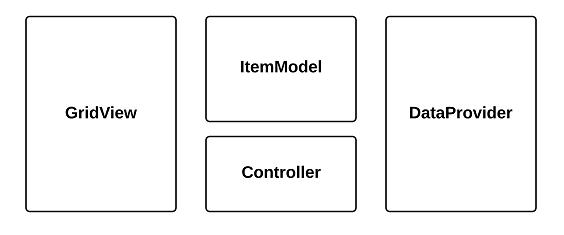
Let’s take a look at the concept diagram and main objects of RealGrid2.
- GridView: An important object responsible for the visible part.
- DataProvider: An important object that manages data.
- DataField: An object that serves as a logical location for data storage.
- DataColumn: An object that contains properties for displaying DataField information on the screen.
- ItemModel or GridItem: A model object that contains row information displayed in the grid.
- Controller: A name that encompasses various internal objects for manipulating items in the grid.
installation
For the process of installing grid, please refer to the Installing RealGrid2 with Script tag document.
In this process, you can see the code that creates LocalDataProvider to hold data and GridView objects to display data.
const container = document.getElementById('realgrid');
const provider = new RealGrid.LocalDataProvider(false);
const gridView = new RealGrid.GridView(container);
gridView.setDataSource(provider);
In the last line, the GridView and DataProvider are connected through the setDataSource() function.
The RealGrid class used in this code is a helper class that helps create the main objects of RealGrid2 and includes several functions to check RealGrid2 version information or license information.
👉 The properties of the
RealGridclass are type information for class creation and are not already created objects, so they must be created through thenewconstructor.
- GridView
- TreeView
- LocalDataProvider
- LocalTreeDataProvider
- ValueType
- getVersion(): Method to check the detailed version of RealGrid2
Creating fields and columns
To import data into the RealGrid2 grid, you must first create field and column according to the data structure.
Sample data example to import into grid
[
   {
       "KorName": "Park Young-ho",
       "Gender": "Male",
       "Age": "71",
       "Phone": "(025)6563-2802",
       "ProductID": "198160731-00008",
       "KorCountry": "Mozambique",
       "Email": "ac@ornareFuscemollis.org",
       "OrderDate": "2021-01-16",
       "CardNumber": "5587-2139-9692-3644",
       "Monetaru": "EUR",
       "StartDate": "2018-02-25",
       "EndDate": "2021-08-12",
       "ToMonth": "23",
       "Month": "41",
       "Year": "3",
       "InterestRate": "0.15",
       "SaveCost": "51000",
       "SaveMaturity": "14950650",
       "CurrentSave": "9304950",
       "Rating": "5",
       "BusinessProficiency": "90",
       "Address": "45-89 Gonghang-dong, Gangseo-gu, Seoul",
       "Button": "Delete"
   },
   ...
]
Create a field
First, let's create a field to retrieve only two values: KorName and Age from the sample data example above.
First, fields are created within the DataProvider using the setFields() function of LocalDataProvider. You can create it. At this time, if you set the fieldName property to the same as the Key name of the data to be imported, the DataProvider will automatically map the data.
For the dataType property, refer to ValueType and enter a Type that matches the type of data.
// create field
provider.setFields([
   {
     fieldName: 'KorName',
     dataType: 'text',
   },
   {
     fieldName: 'Age',
     dataType: 'number',
   },
]);
Create a column
A column is an object that displays data contained in the DataProvider on the grid. You can create columns using the setColumns() function of GridView.
For the column, you can implement DataColumn. If you enter the fieldName value of the data field to be imported for the fieldName property, data in the field with the same name will be found and displayed on the screen.
// create column
gridView.setColumns([
   {
     name: 'KorNameColumn',
     fieldName: 'KorName',
     type: 'data',
     width: '70',
     header: {
       text: 'name',
     },
   },
]);
The above code creates a column that will be connected to the KorName field among the two fields, KorName and Age. There is no need to create columns and connect all fields like this. Additionally, if you simply want to make a column invisible in the grid, you can set the visible property of DataColumn to false.
For more information about DataColumn, check out the guide link below.
- Create a column
- Change column properties
- Automatic adjustment of column width
- Data sorting
- Move column
- Data Filtering
- Auto Filtering
- Column Layout
- Column width adjustment
Grid where fields and columns are created
To see the full code, click the <> button below the grid.
You are now ready to display your data in the grid. In Next Step, Fetching Data into Grid, we will learn how to fetch data into DataProvider.